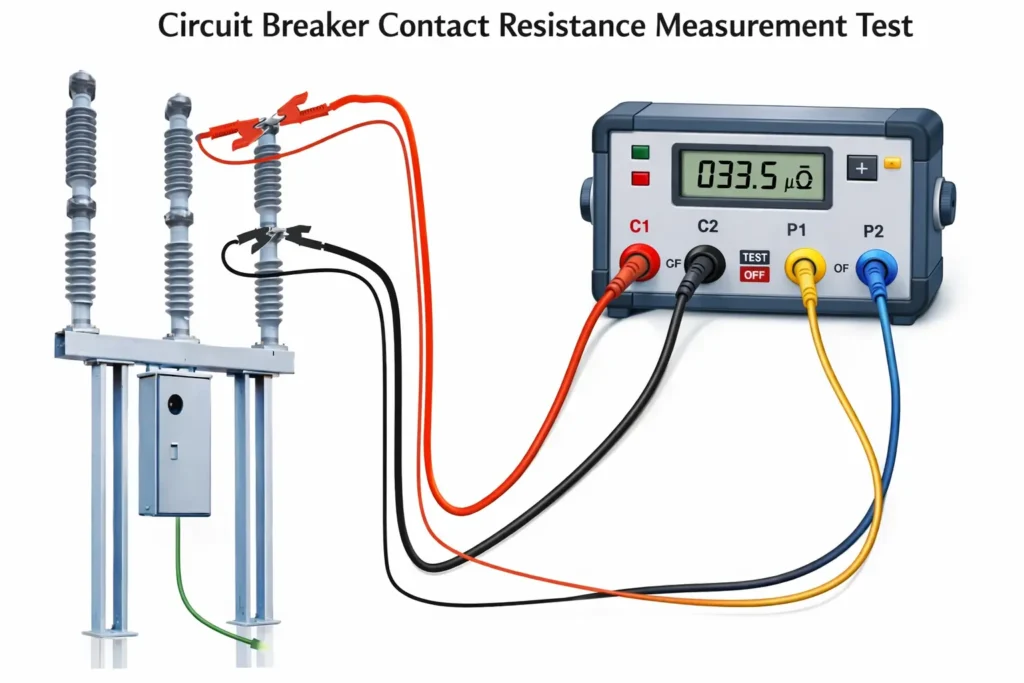
Contact resistance measurement is an important diagnostic test which is used to access the condition and performance of electrical contacts in substation or power station equipment such as circuit breaker, isolator, bus bar joints, and various other connectors. The contact resistance measurement is performed using a low resistance ohmmeter or micro-ohmmeter based on kelvin four terminal method, which eliminates the lead and contact errors. A high DC test current is then injected through the contacts of the sample equipment in closed state, and resulting voltage drop across the contacts is then measured, which gives out the accurate resistance values in micro-ohm range using ohms law.
Table of Contents
Reasons of increase in contact resistance
Electrical contacts are designed to carry high currents with minimal losses. However, because of factors such as oxidation, corrosion, improper tightening, contact wear and misalignment, the resistance at the contact surface increases and is identified by contact resistance measurement.
Oxidation and corrosion
Because of oxidation and corrosion in the contact surface, an insulating layer forms on contact surfaces specially in presence of moisture, pollution or reactive gases, which restricts the effective current flow, generating heat as a result.
Mechanical wear and misalignment
Mechanical wear and misalignment of switchgears is basically caused because of repeated operation, vibration or poor installation, which reduces the effective contact surface, forcing the current to pass through fewer micro contact points, also resulting in inefficient energy transfer and generation of heat at the contact surface.
Poor contact pressure
Poor contact pressure often results from weakened springs, loose fasteners and improper adjustments also limits the metal to metal contact, thus increasing the constriction resistance.
Pitting due to arcing and switching duty
Pitting because of arcing and switching duty leads to uneven contact surface and generates craters and molten spots at the contact surface. This also leads to high contact resistance path.
Equipment covered under contact resistance measurement
Contact resistance measurement is applicable to various primary equipment of substation which are responsible for reliable current transfer. These essentially includes SF6 circuit breakers, vacuum circuit breakers, air circuit breakers, which are to be routinely tested to verify the condition of main contacts and ensure low resistance current path under normal and fault conditions. Isolators and earth switch are also to be tested for contact resistance measurement to check the integrity of fixed and moving contacts as these are susceptible to oxidation and loss of contact pressure because of frequent operations.
Busbar joints and clamps are to be evaluated to detect loose connection, corrosion, or improper assembly, which can lead to overheating. Cable termination and joints can also be included for contact resistance measurement to identify poor crimping, degradation, and moisture ingress to ensure safe, efficient and long-term operation.
Test principle
Ohm’s law and millivolt drop method
Contact resistance measurement is based on Ohm’s law, where the resistance is calculated as the ratio of measured voltage drop to the injected current R = V/I. Because the contact resistances are usually extremely low, millivolt drop method is used, in which a known DC current is passed through the contact and the resulting voltage drop in millivolt or microvolt range is measured. This method provides high accuracy and repeatability, allowing reliable assessment of the contact condition.
Importance of high DC test current
Applying a high DC test current is essential for obtaining meaningful contact resistance values. High current typically 50 to several hundred amperes overcome the surface irregularities, oxide layers and thin contamination films present at contact interfaces. The high DC current ensures that multiple microscopic contact points conduct this current simultaneously, simulating the actual load conditions. Low test current can produce unstable or artificially high readings because of partial conduction through surface films.
Elimination of lead resistance by using kelvin method
The kelvin or four terminal measurement method is used to eliminate the errors caused by the test lead resistance and auxiliary contact joints. In the kelvin method, one pair of lead injects the test current through the contact of the equipment under test, while another pair of potential leads measures only the voltage drops across the contact of equipment under test. Since, the voltage measurement circuit draws negligible current, the resistance of the leads and joints has negligible influence in the reading. This technique enables precise measurement of very low resistances in micro-ohm range, which is essential for contact resistance measurement test.
Test Equipment
Micro-ohmmeter or Ductor
A micro-ohmmeter, also known as a Ductor, is the primary instrument used for the contact resistance measurement. It is specifically designed to inject a high, stable DC test current and accurately measure the resulting voltage drop, thereby computing very low resistances in micro-ohm range. Modern micro-ohmmeter offers selectable test currents, digital filtering, temperature compensation, and data storage feature. These are capable to deliver current ranging from few amperes to several hundred amperes.
Current and potential leads
Contact resistance measurement uses two distinct set of leads one for injecting the current known as current lead and other set for measuring the voltage known as potential leads, in accordance to kelvin four terminal method. The current leads are heavy with low resistance cables designed to carry high DC current to the test object from the micro-ohm meter while the potential leads are lighter and highly sensitive connected across the contact of the equipment under test to measure the voltage drop.
Steps of contact resistance measurement test
Preparation and safety check: Ensure that the equipment to be tested is isolated from the power system and de-energized properly for safe working. Verify the work permits and equipment identification. Clean the terminal contacts wherever accessible.
Connection of test leads: Connect the heavy current leads across the main current path of the equipment under test and attach the lighter potential leads across the contacts of the equipment under test. Make sure that if the equipment under test is circuit breaker, it is in closed condition.

Instrument setup: Use a calibrated micro-ohmmeter and connect the test leads to the meter accordingly to manufacturer’s manual. C1 & C2 or C+ & C- for current leads and P1 & P2 or V+ & V- for voltage lead and E for earthing lead to earth the micro-ohmmeter.
Injecting the test current: Initiate the test and allow the DC current to stabilize. Some micro-ohmmeters allow for manual selection of test current 100 A or 200 A selection based on the equipment under test.
Measurement and recording: Record the stabilized resistance value displayed in the micro-ohmmeter and repeat the measurement for other phases of the same equipment.
Restore the equipment under test: Once the test is completed, proceed with all clearances and allow charging of the equipment after the measurements agrees with the standard values.
Acceptance criteria
Acceptance criteria for contact resistance measurement is based on absolute values, phase uniformity, and utility practice. Typical contact resistance values for high voltage for high voltage circuit breakers lie in the range of 20 -60 µΩ per pole, while for isolators, busbar joints and clamp terminations are to be expected below 100 µΩ. In addition to the absolute limits, phase to phase comparison is essential, most utility permits a deviation of +/- 20 % between phases for a healthy equipment. Deviation beyond this indicates potential contact defects. However, final acceptance is usually governed by utility specific benchmarks and factory datasheet of the equipment.
This article is a part of the Testing and commissioning page, where other articles related to topic are discussed in details.

