Circuit breaker replacement is a critical process and must be done by an experienced person. As we know that the circuit breaker is an essential equipment that protects the circuit from overcurrent and overloading conditions in the circuit. Hence, when the circuit breaker goes bad, circuit breaker replacement must be done in order to keep the circuit protected with the new circuit breaker, or else during faults, appliances in the circuit will get damaged and there will persist risks of fire hazard.
Table of Contents
As we can know from the previous article, how to tell if a circuit breaker is bad, the status of the breaker. It can go bad because of mechanical wear from continuous operation over time, or overheating, and other reasons already explained. We can know why the circuit breaker replacement is essential.
It shall be noted that the circuit breaker replacement must be done by a qualified professional.
Tools required for a circuit breaker replacement
For the domestic circuit breaker replacement, the required tools are
Insulated Screwdriver and pliers: Insulated pliers and screwdrivers are essential tools for any electrical work, as the insulated part provides protection against any electrical shock while working on live circuits and terminals. These tools are used for making a physical connection tight or loose, or to make the required adjustment as needed for the job, with safety, and in an efficient way.
Multimeter: A Multimeter is a vital device used for diagnostics of electrical parameters. It helps the operator to know if the circuit is live before starting any work on the electrical circuits and the terminals of the breaker. Multimeters measure voltage, resistance, and continuity of the wire, making them an indispensable tool for circuit breaker replacement or any other electrical work.
Safety Gloves and Goggles: These are a part of the personal protective equipment that protects the electrician from any electrical shock, burns, and flying chips. The glove prevents direct body contact of the operator with any energized part, while the goggle provides protection against sparks, dust, or flying chips that may come out during working. The use of these reduces the risk while working in an electrical circuit significantly.
Flashlight: Flashlight is an important tool for working in poorly lit areas like breaker panels located in basements. It ensures that the operator’s vision is clear for making a correct connection, reading breaker labels, and adjusting the screws. A good lit environment ensures fewer human errors, ensuring more safety during electrical work.
For high-voltage circuit breaker replacement, apart from the above tools, the required tools are
Torque wrench: It is used for tightening/loosening mechanical connections that clamp the high voltage circuit breaker in place. In case of high voltage circuit breaker replacement, the torque at the nuts & bolts must be accurate for a vibration-free joint. Overtightening can break the clamps, or under-tightening can cause heating and arcing in the terminal points, resulting in mechanical failure.
High voltage test kit: It is required to perform dielectric tests, insulation resistance tests, contact resistance measurement (CRM), and timing analysis of the breaker. These tests are a must for a high-voltage circuit breaker before 1st energization. The kit allows performing these tests on the replaced breaker and ensuring its performance under high voltage conditions.
Pneumatic tools: These are the tools that basically run on compressed air. For dismantling and installing a new circuit breaker, large CBs often need the support of pneumatic tools for large nuts and bolts connections. It saves time on installation compared to the use of hand tools in the process of circuit breaker replacement.
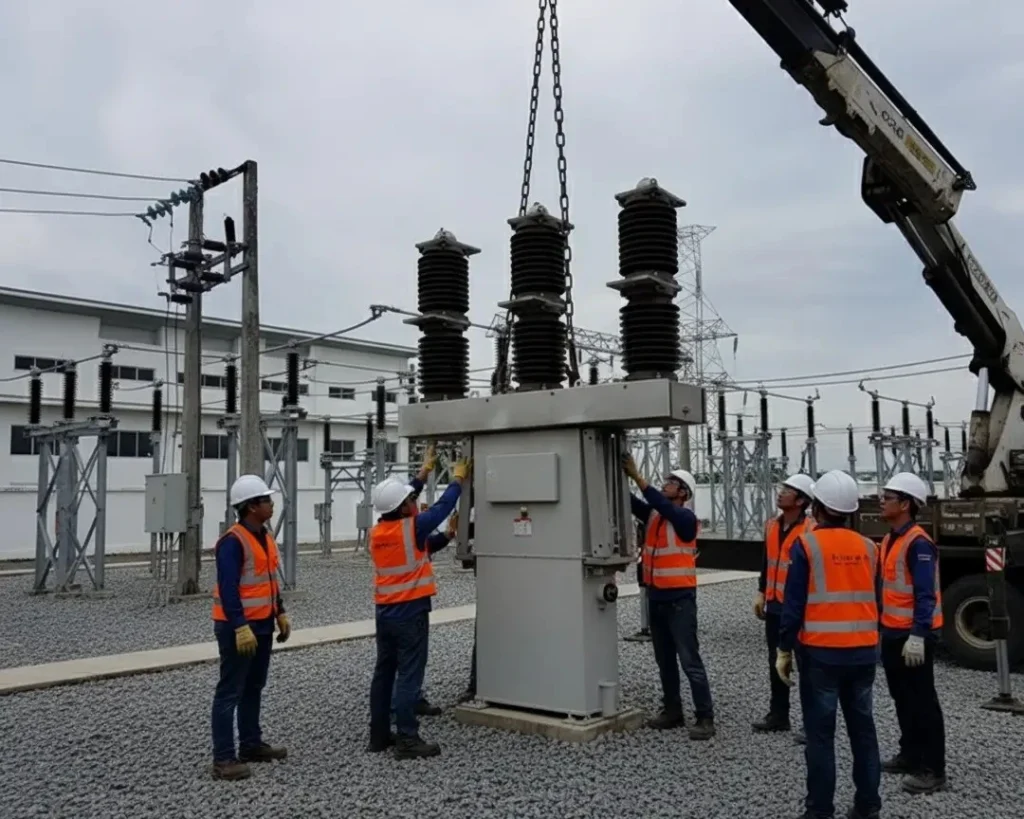
Crane: A crane or lifting machine is a must for high-voltage, large circuit breaker replacement, as the breaker units are very heavy and bulky. The crane or lifting machine assists the manpower in lifting, aligning it over the structure, positioning, and installing the circuit breaker components for a safe installation. Proper use of the lifting machine makes sure that the equipment is not damaged in the process.
Gas cylinder and associated equipment: The gas cylinder and gas filling kit are used after the installation of the SF6 circuit breakers to fill the unit with proper gas pressure and ensure the gas density is sufficient for its normal operation. Since SF6 is a potent greenhouse gas, it must be properly handled.
Safety precautions for circuit breaker replacement
Mains OFF: The main power supply must be turned out and made sure it’s in the OFF position. This ensures that the electricity is cut off from all associated circuits, nullifying the chance of direct contact with live wire and increasing safety.
Test with a voltage tester: After the mains is turned out, it is essential to check the circuit with a voltage tester or multimeter to confirm that the circuit is potential-free.
Use insulated tools and PPE: The tools used for the circuit breaker replacement must be insulated, and the use of Personal Protective Equipment is mandatory.
Do not touch Live Bus bar: Inside the panel, even when the mains are OFF, the incomer in the MAINS and its associated BUSBAR is always live. It is thus essential to make sure that no contacts are being made with this BUSBAR, or else it will result in a fatal accident.
Steps for Circuit Breaker Replacement
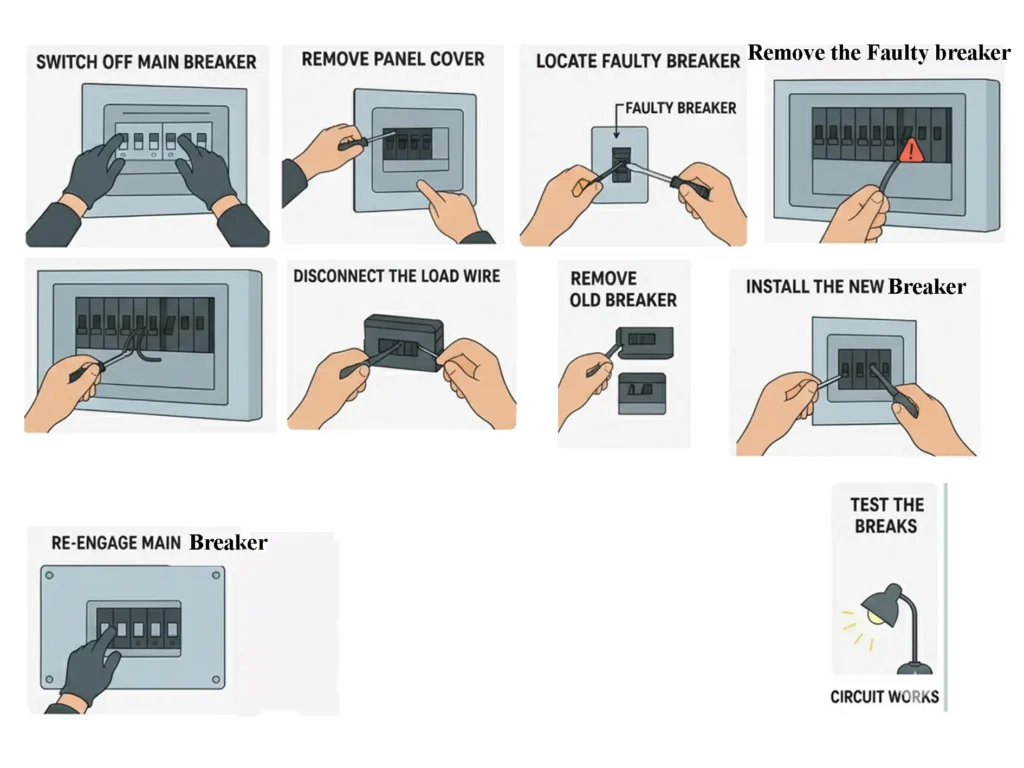
Switch OFF the Main Circuit Breaker: It will make sure that the breaker panel has no power.
Remove the Cover: The circuit breaker panel has a covering that is secured with screws. Unscrewing it and removing the cover will give access to the faulty circuit breaker.
Identify the Circuit breaker: The faulty circuit breaker must be identified for the circuit breaker replacement.
Verify no power: Verify with a voltage tester that no power is available in the terminal of the breaker.
Remove wires from terminal: With the help of an insulated screwdriver, the terminal screws must be loosened for the removal of the wires connecting the source and load.
Remove the faulty breaker: After removal of all electrical wires, the faulty circuit breaker must be removed from the slot by pulling action.

Install the new breaker: The new breaker must be put into the slot of the old breaker; the rating and type of the breaker must be checked and matched with the load before installation.
Connect the load wires: After installation of the circuit breaker, we must reconnect the electrical wires of the load and source back to the new circuit breaker’s terminal and tighten the screws for a good connection.
Assemble the panel cover: After the connection of wires, the panel cover must be assembled, and the screws at the places must be tightened.
Restore power: After the installation process is complete, the power must be restored to the circuits by switching the Main breaker ON.
After the circuit breaker replacement is done, it must be checked if the new circuit breaker holds the ON position without any signs of overheating, flashing, or burning smell. It should be labelled for future identification and use.
Common Mistakes
- Forgetting to turn OFF the Main circuit breaker before the replacement works is a common mistake and must be avoided.
- Leaving the terminal connection loose after installation of the new circuit breaker. It will result in a temperature rise at the terminals.
- Using the wrong rating and type of circuit breaker is a common mistake that must be avoided, as it is not safe.
- Also, using a substandard counterfeit breaker to save money is a common mistake and must be avoided, as it compromises safety.
Steps for high-voltage circuit breaker replacement
High-voltage circuit breaker replacement is a more complex process than low-voltage circuit breaker replacement. It requires special attention to details and must follow a standard operating procedure or company guidelines. The first step in the high-voltage circuit breaker replacement is planning.
Planning
In this process, reviewing the SOP and manufacturer guidelines for the installation of a new circuit breaker is done. Then the permit to work (PTW) is obtained for working at the high voltage level. At the same time, the load dispatch centers must be informed of the planning of the work. Arrangement of all tools and equipment needed must be completed beforehand to reduce the outage of power. The compatibility checks of the new circuit breaker are done at the initial stage.
Execution

- De-energize upstream and downstream breakers, and also open the isolators for complete isolation of the circuit breaker to be replaced.
- Close the earth switch on both sides of the breaker to be replaced so that if any residual charge remains, it can be grounded.
- Ensure that all personnel wear full PPE, an arc flash suit, helmet, gloves, and shoes.
- Firstly, disconnect all the DC control connections, like trip/close coil and auxiliary contacts.
- Disconnect the AC supply to the breaker, which is utilized for spring charging and other operations.
- Disconnect all terminal phases of the circuit breaker by loosening the bolts and removing the conductor.
- If the breaker is an SF6 circuit breaker, before the circuit breaker replacement, the gas must be evacuated and stored properly.
- For the dismantling of the mechanism, dismantle the operating rod, linkage, and interlocks.
- Electrical clearances must be checked and ensure no interferance of any tools whatsoever to avoid any fatal accidents.
- Using a crane, the breaker poles must be brought down first, and then the tank assembly is brought down from the structure and placed on a transferable pallet for safe disposal.
- The new breaker’s tank assembly is positioned on the foundation structure, and alignment and level are checked with the bus and isolator, and then it is secured in the position by tightening the bolts in the structure.
- Reconnect the operating mechanism by connecting the operating rod, linkage, and interlocks.
- Connect the terminal conductors from the bus and line on each side of the new circuit breaker.
- Connect the DC control wiring to the trip/close circuit and auxiliary contacts.
- Connect the AC supply to the breaker for spring charge operation, heater, and emergency light, etc.
- For SF6 circuit breakers, fill them up to the rated pressure and check for any leakage.
- For Vacuum circuit breakers, check the integrity of the vacuum bottles.
- Before energization, all mechanical checks must be completed, like the operation of the breaker manually, spring charging operation, and interlocks.
- The electrical tests include contact resistance measurement, insulation resistance, high potential test, and breaker timing test.
- The gas density is checked for relay operation, and the control circuit is checked by remotely operating the circuit breaker via SCADA.
After all recorded values agree with factory standard data, the breaker is energized by following the utility’s charging protocol. This marks the circuit breaker replacement.
This article is a part of the Switchgear, where other articles related to switchgear are discussed in details.

